
This example represents a situation, in which you want to display values from parent entity on a child form.
How can this be useful?
Your sales people want to see, let’s say the relationship type of an Account on a Contact form. To see if the person they are talking to is already a customer or still a prospect.
Or they want to see the City of the parent Account whenever they open an Opportunity – to find out if they can pay the prospect a visit while they’re in town.
Ultimately, you’re going to save yourself clicks and avoid confusions by having it all in one place.
How can this look?
When I open a contact, in this case Charles Winston, the app shows me the relationship type of his parent account Déjà vu. We named this field ˈAccount Typeˈ.

How can this be achieved?
Note: If you’re running Woodford version 11.3 or newer, now there is an even simpler way to set up the displaying of information from a parent on a child form. How to set it up is described at the end of this blogpost.
It’s quite simple, really.
Using Resco’s form rules (portable counterpart of Dynamics CRM workflows), you can show one or more Fields from the parent form on the child form.
For this, we will use the shared variable.
This will only show field data (read only), not allowing the user to change them.
Note: If you want for the child entity to inherent data from its parent, this can be easily done via form rules as well. But for now, we will be talking only about displaying the data, not copying the information from the parent onto the child.
_________
Instructions:
Because we need to load the parent data not only after opening a record, but also after filling in/changing the lookup field ˈregardingˈ, we will use On Change rule. (On change will also work whenever you load/open the record.)
For this example, we will use Contact as child, and Account & Contact as parents.
 The rule itself will be created on the child entity, because that is where we want to show the parent data. I’ll go into Contact Edit Form and click on the On Change rule.
We will create shared variable, where the data from parent will be set.
First, click on the arrow at Shared variable (1) and then Add Variable (2). It will create a shared variable, where you need to set the type (according the type of data that is to be displayed from the parent entity record). Name of the variable depends on you; however remember it can only contain alphanumeric characters and underscore “_”. The number of shared variables needs to correspond with the number of parent fields that you want to display on the child record. Click on the arrow (1) again to close the shared variable section.

Now you need to create a condition to specify the situation, in which the parent data will be set to the shared variable field on the child entity.

In general, the condition should at least contain check (whether the lookup, where the parent entity is set, is filed in). Otherwise you will get an error. Also, because we are creating an On Change rule, a good practice is to add a condition that specifies the field that is changed (otherwise the rule will be triggered again and again after each change, ending up in an endless loop that may cause a potential crash of the app).
I will also add a condition, in which I will check the type of the target of the lookup field. This is because the Contact’s field Parent Customer can have Account or Contact as a target – and I need to make different rules for different targets.
The whole condition then looks like this:

Next step is to create a variable. Here I will load the parent entity instance, so that I will have access to its data.
Variable type is Entity, as we are loading an entity instance. Name of the variable depends again on you. In some cases, like loading an option set, it is better to use the entity name as variable name, so the name of the option set value is resolved automatically. Then we need to specify the lookup that points to the parent record (parentcustomerid) and the target. In this case I will set Account, as this is what we tested in the condition.

Now, we can access the parent field data (Account). So I will add a step and set the parent Account’s Relationship Type field to the shared variable.

But, in case the parent record is a Contact, I want the field to display the information on inability of the relationship type. So I will add the otherwise if condition and specify another condition, similar to the first one, but using a contact as the parent customer type.


In this case we will only use text that will be displayed in the shared variable (in our case simple N/A will do). It’s a string, so it is OK.

There is one more step and we’re done. We need to place the shared variable on the edit form. I’ll save the rule and place the shared variable on the form.

Then I’ll just save the edit form, publish the project and synchronize the Resco Mobile CRM application.
P.S.: The display name of the shared variable can be changed in Localization. Just add a new item and enter the name of the Shared variable as ID & string as the future display name.
P.S.2: If you want to make the field appear to users as read only, add one more step, in which you set the form item Relationship_Type as disabled (for editing). Otherwise user will be able to change the field value, but this change will not be saved anywhere.
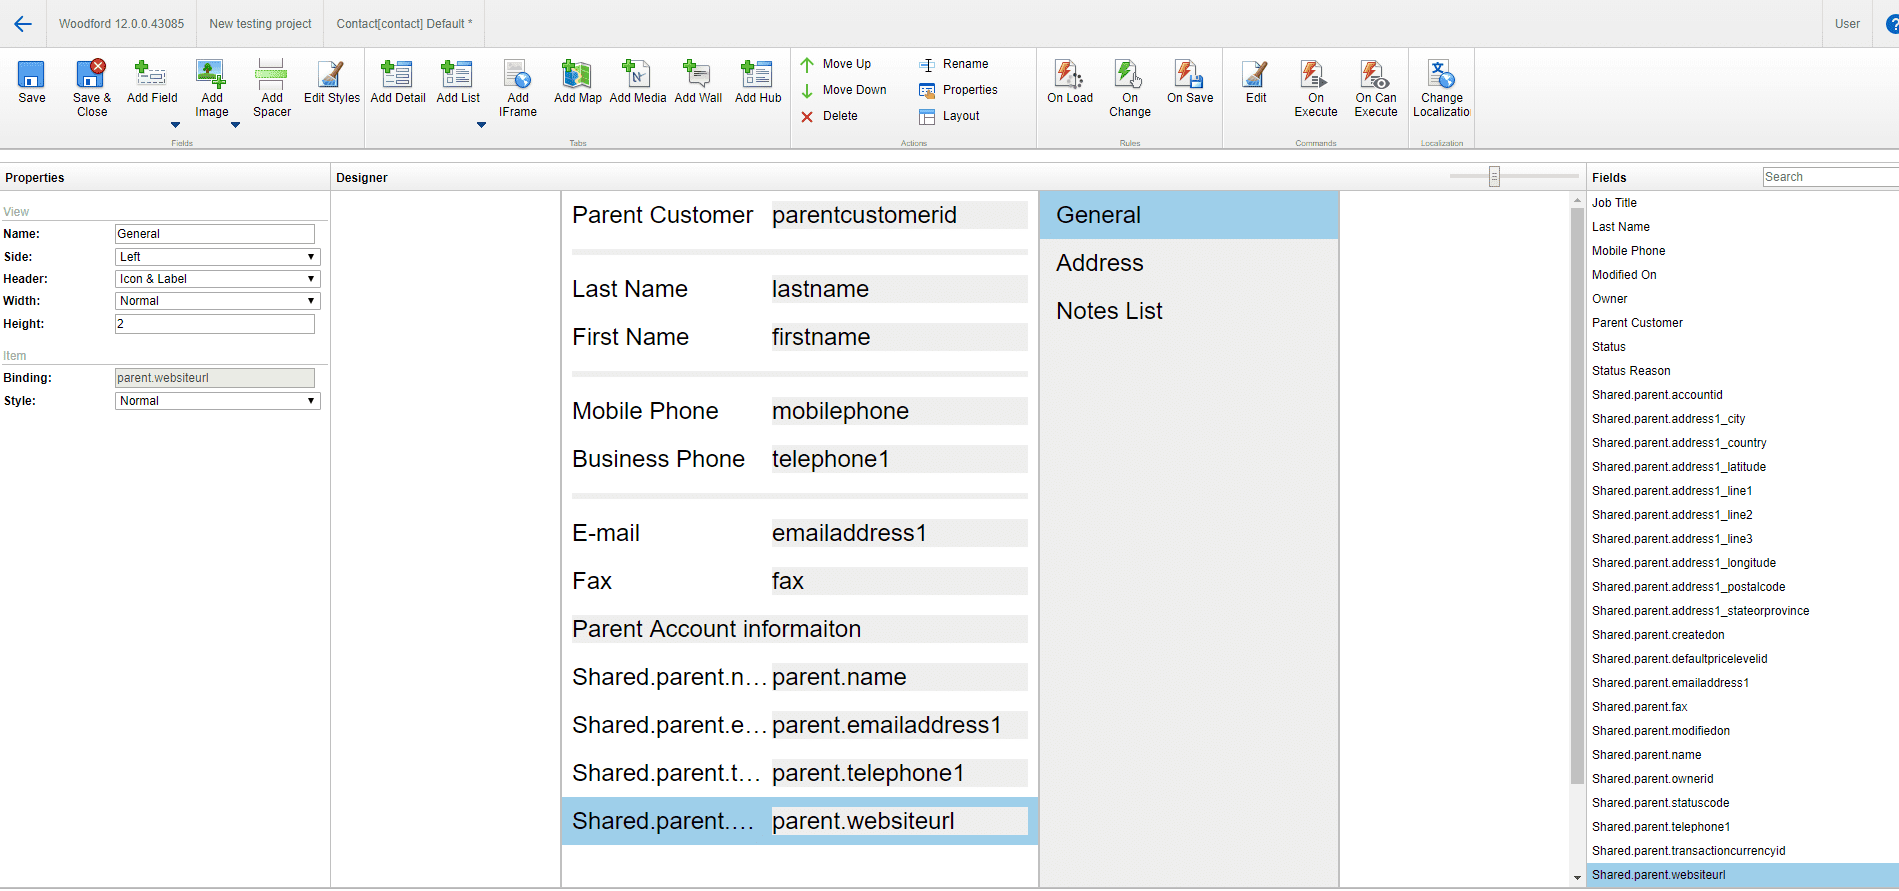
For Woodford 11.3 or newer: Another option, possibly much easier than having separate shared variables for each field from of the loaded parent entity, is to use the Shared variable type of Entity. Initializing it (loading the specific entity values to the shared variable), will automatically add all the fields from this entity to the Field Explorer section of the Form designer.
The rule itself can be much more simple comparing to the above example

And then just place the needed fields from the parent Account entity to the Contact form.
Of course these steps can be applied to other situations. Perhaps you’d like to display Account’s address on an Order. Or show a Contact’s phone number on a Service Activity. The choice is yours. We just provide the means.
Need some help?
We are always here, to answer your questions at mobilecrm@resco.net